
You know that moment when you hear the first tiny “peep” from your incubator? Pure magic, right? But here’s the thing – chicken eggs take only 21 days to hatch, which means you’ve got exactly three weeks to get your act together and create the perfect nursery for your soon-to-be fuzzballs and perfect your chicken brooder setup.
I’ll be honest with you – my first brooder setup was a disaster worthy of a chicken-keeping blooper reel. Picture a cardboard box, a desk lamp that kept falling over, and me frantically googling “why are my chicks huddled in one corner” at 11 PM. Spoiler alert: they were freezing.
Here’s what I wish someone had told me from the start: newly hatched chicks are surprisingly tough little things. They can actually survive 2-3 days without food or water thanks to that nutritious yolk sac they absorb right before hatching. But – and this is a big but – they need their brooder environment to be spot-on from day one. We’re talking 95°F warmth and at least 6-7 square inches per chick, or you’ll be dealing with cold, stressed babies faster than you can say “emergency vet visit.”
The reality check that motivated me to get serious about my chicken brooder setup? 67% of chicken keepers experienced health or behavior issues with their chicks in the first 12 months. That’s a statistic I was determined not to join after my first rocky experience with three Rhode Island Red chicks who spent their first week shivering in what I generously called a “brooder” (my family called it a fire hazard).
Whether you’re about to welcome your very first peeping crew or you’re a seasoned chicken parent looking to upgrade your setup, I’m going to walk you through everything I learned the hard way. From choosing a chicken brooder that won’t become a death trap to positioning your heat source so it actually keeps your chicks cozy instead of cooking them, we’ll cover it all. Trust me, your future self – and your chicks – will thank you for getting this right from the start.
Timing the Great Migration: When Your Chicks Are Ready for Their New Home
The move from incubator to chicken brooder is like a chick’s first apartment hunt – timing is everything, and get it wrong, and you’ll have some very unhappy tenants.
After watching dozens of hatches over the years, I’ve learned to read the signs that tell me when chicks are ready to make the big move. It’s not rocket science, but it does require a bit of patience (something I had to learn after rushing my first batch).
Reading the Ready-to-Move Signs
The golden rule? Wait until your chicks look like tiny cotton balls instead of wet, bedraggled aliens. This fluffing-up process typically takes 12-24 hours after hatching, and trust me, you’ll know when they’re ready. Here’s what I watch for:
The Fluff Factor: Their downy feathers should be completely dry and puffed out like they’ve been through a tiny blow-dryer session. Wet chicks = cold chicks = potential problems.
The Exploration Phase: Ready chicks are curious little explorers, peeping around the incubator like they’re mapping out their territory. If they’re just lying there looking pathetic, give them more time.
Steady on Their Feet: They should be able to stand without doing the “baby bird wobble dance” every two seconds. A little unsteadiness is normal – they’re not training for the Olympics here.
Empty Bellies (Sort Of): That yolk sac should be fully absorbed, giving them a nice round belly without any weird protrusions.
The Waiting Game: How Long Can They Stay?
Most experienced chicken folks (myself included) keep chicks in the incubator for 12-24 hours after hatching. But here’s where it gets interesting – chicks can actually hang out in there for up to 48 hours after the last one hatches without any major drama.
This flexibility is pretty amazing when you think about it. Those chicks absorbed their yolk sac right before hatching, essentially packing a three-day lunch before making their grand entrance. Nature’s pretty smart that way.
I usually wait until I’ve got a decent batch hatched and they start getting restless – you’ll know because they’ll start bumping into the unhatched eggs like tiny battering rams. But I never, ever leave them past the 48-hour mark. That’s when dehydration becomes a real threat, and nobody wants to deal with that mess.
The Goldilocks Principle: Not Too Early, Not Too Late
Moving chicks too early is like sending them outside in winter without a coat. Their internal thermostats are basically broken for the first few days, so pulling them out before they’re properly dried is asking for trouble. Cold, stressed chicks are sick chicks.
But leaving them too long creates a different set of headaches. After 48+ hours, you’ll start seeing the warning signs: excessive peeping (and not the happy kind), listless behavior, droopy wings, and pale little legs. These are chicks telling you they’ve overstayed their welcome and need proper food, water, and space to move around.
Getting this timing right means your chicks transition smoothly from their incubator “hotel” to their brooder “home” where they can spread out, eat properly, and start acting like the little dinosaurs they’re meant to be.
Your Chicken Brooder Shopping List (AKA: The Stuff That Actually Matters)
After setting up more chicken brooders than I care to count (and making just about every mistake possible), I’ve learned that preparation is everything. Trust me, scrambling to find a suitable container at 9 PM when your chicks are ready to move is not the kind of adventure you want.
The good news? You don’t need to break the bank or build something that looks like it belongs in a fancy farm magazine. Your chicks care more about warmth and safety than Instagram-worthy aesthetics.
Finding the Perfect Chick Nursery
Your chicken brooder container is basically a temporary apartment for your growing babies, and like any good rental, location and amenities matter more than curb appeal. Here’s what I’ve tried (and what actually worked):
The Winners:
- Large plastic storage bins – My personal favorite for small batches
- Puppy playpens with zippered tops – Genius for active chicks who think they’re escape artists
- Stock tanks or galvanized tubs – Perfect for larger broods
- Kiddie pools – Surprisingly effective and easy to clean
The “Seemed Like a Good Idea” Category:
- Cardboard boxes – They work until they don’t (usually when they get wet)
- Unused bathtubs – Great until you need to actually use your bathroom
The magic formula for any container: rounded corners (sharp corners create death traps where chicks pile up), sides tall enough that your little Houdinis can’t escape, and protection from household pets. Also, make sure your brooder lives in a room that’s at least 50°F – your chicks’ heat source shouldn’t have to fight against a freezing basement.
The Must-Haves That’ll Save Your Sanity
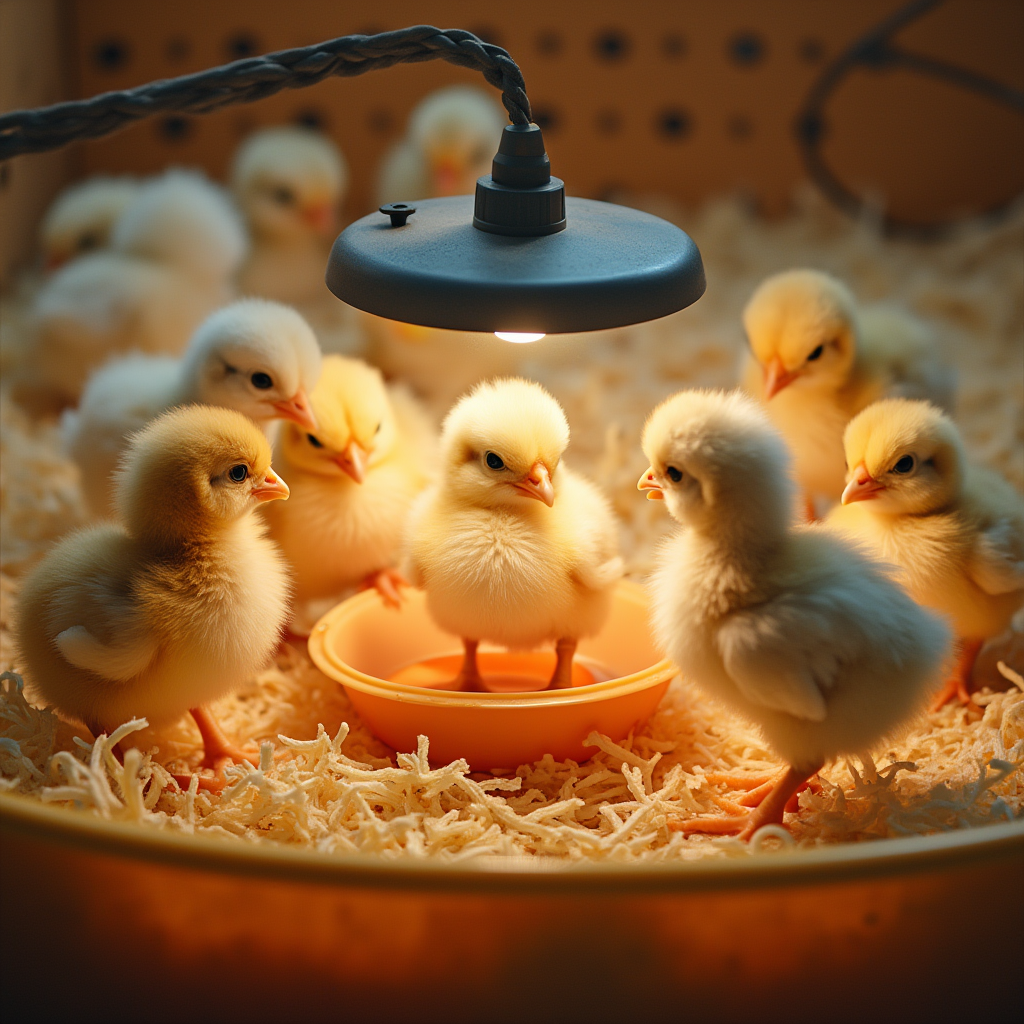
Let’s talk heat sources first, because this is where I see most beginners (myself included) mess up. Heat lamps are cheap and available everywhere, but they’re also fire hazards waiting to happen. I learned this lesson when my heat lamp fell into the brooder at 2 AM – thankfully onto bedding, not chicks.
Heat plates are your friend here. Think of them as electric mother hens – chicks can snuggle underneath when cold and wander away when they’re comfortable. Much safer than having a blazing hot bulb dangling over your babies like a tiny sun.
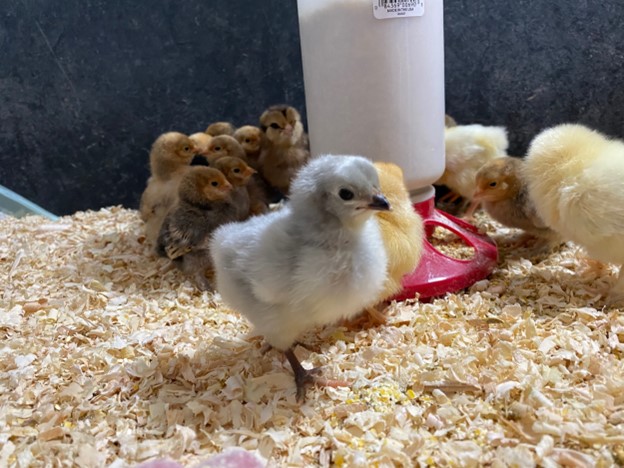
For bedding, pine shavings (about 1-inch thick) are the gold standard. Never cedar – it’s like giving your chicks a respiratory system workout they don’t need. For the first few days, I actually cover the shavings with paper towels. Sounds fussy, but it prevents the little ones from eating bedding instead of food (yes, they’re that confused at first).
Here’s where regular bowls will make you want to pull your hair out: chicks are natural-born mess makers. They’ll kick bedding into their food, knock over water containers, and somehow manage to get soaking wet in a half-inch of water. Chick-specific feeders and waterers aren’t just fancy marketing – they’re sanity savers. I arrange multiple feeding stations around the heat source like spokes on a wheel, which encourages the chicks to move around and prevents the inevitable food fight pile-ups.
Getting the Numbers Right
Your chicks are surprisingly good at telling you if their living situation is working. Start at 95°F for week one, then drop it by 5°F each week. But forget the thermometer drama – just watch your chicks. Huddled together like they’re planning a revolt? Too cold. Spread out like they’re sunbathing? Perfect. Panting and avoiding the heat source like it’s cursed? Too hot.
Space-wise, start with at least 6-7 square inches per chick, but plan to expand to 1/2 square foot for weeks 0-4 and a full square foot for weeks 4-8. Think of it like teenagers – they need more room as they grow, and cramped quarters lead to attitude problems (aka pecking and stress).
The bottom line? Your brooder setup doesn’t need to be Pinterest-perfect, but it does need to keep your chicks warm, safe, and happy. Get these basics right, and you’ll be amazed how much easier everything else becomes.
Putting It All Together: Your Brooder Assembly Guide
Alright, supplies gathered and game plan ready? Time to create a chick paradise that would make any mama hen proud. The difference between a thrown-together setup and a thoughtfully arranged chicken brooder is often the difference between stressed, sickly chicks and thriving, happy ones.
Getting Your Heat Source Right
Your heat source placement is like the foundation of a house – get this wrong, and everything else falls apart. For heat plates, position them so your chicks can access the warmth from multiple sides. Never stick them in corners where curious chicks might get trapped behind them – trust me, chicks are like tiny feathered Houdinis when it comes to finding trouble.
Set the temperature to 95°F for week one, then dial it down by 5°F each week as they grow. Think of it as gradually weaning them off their artificial mama’s warmth.
Heat lamps require extra caution. Secure that sucker at least three ways – the clamp it comes with, plus a chain and wire backup. Heat lamps have a nasty habit of falling at the worst possible moments, and a house fire is definitely not the kind of excitement you want from chicken keeping. Hang it 18-24 inches above your chicks, and keep it at least 12 inches from any bedding to avoid turning your chicken brooder into a bonfire.
Creating the Perfect Floor Plan
Start with your foundation – a non-slip base like shelf liner or puppy pads works wonders. Nobody wants to watch baby chicks doing the splits on slippery surfaces. Add 3-4 inches of absorbent bedding on top – pine shavings are your friend here, but stay far away from cedar (it’s like chick kryptonite for their tiny respiratory systems).
For the first few days, consider laying paper towels over the bedding. Newly hatched chicks have about as much common sense as toddlers and will try to eat anything, including their bedding. The paper towels give them a safer surface while they figure out the difference between food and floor covering.
Block drafts like you’re protecting a campfire – chicks are draft magnets and will find any cold air current to huddle away from. But don’t seal them up completely; they still need fresh air circulation to stay healthy.
Smart Food and Water Placement
Here’s where strategy comes in: place feeders and waterers on opposite sides of the brooder, away from your heat source. This simple trick encourages your chicks to move around and build those leg muscles. Think of it as creating a tiny gym where they have to walk for their meals.
Use feeders designed specifically for chicks – short bases and small troughs that won’t become diving pools for adventurous babies. Once your chicks are a few days old, elevate the feeders on small blocks to keep bedding from becoming an unwanted seasoning in their food.
For water, shallow is the name of the game. Chicks can drown in surprisingly little water, so invest in proper chick waterers. If you’re improvising, drop some clean marbles in the water trough – they’ll take up space and create a safer drinking environment.
Your chicks will tell you everything you need to know about your setup. Watch them closely – they’re surprisingly good communicators once you learn their language.
Those Make-or-Break First 72 Hours
The first three days after your chicks move into their brooder are when everything either clicks into place or goes sideways fast. I’ve learned that these early hours set the tone for your entire chick-raising experience – get them right, and you’ll have confident, healthy birds. Miss the mark, and you’ll be dealing with stressed, struggling chicks who never quite catch up.
Getting Your Chicks Started Right
Water first, food second – that’s the golden rule I wish I’d known with my first batch. The moment you place those fluffy bundles into their new home, your job is to show them where the water is. Gently dip each chick’s beak into the waterer – just a quick touch to the surface. You’ll only need to teach a few; chicks are surprisingly good teachers to each other once they figure things out.
Here’s something that caught me off guard: wait about an hour before offering food. I used to panic when chicks didn’t immediately start eating, but they need time to get their bearings and hydrate first. Remember, they’ve got that yolk sac nutrition still working for them.
Once they’re settled, keep food and water available around the clock. During those first 24 hours, I make it a point to check their crops – that little pouch in their neck where food collects. A nice, full crop means they’re eating well. A flat crop? Time for some gentle encouragement. I’ve found that sprinkling feed on white paper towels or offering a few tiny mealworms gets even the most reluctant eaters interested.
Reading Your Chicks Like a Book
Your chicks will tell you everything you need to know about how they’re doing – you just need to know their language. Happy, healthy chicks are little explorers. They’ll wander around the chicken brooder, chirp contentedly (think pleasant background chatter, not frantic peeping), and distribute themselves fairly evenly throughout their space.
Don’t panic when they sleep a lot during that first week. Chicks are basically tiny growing machines, and all that development takes energy. What you’re watching for are the warning signs: panting, huddling in tight groups, or spreading as far from each other as possible. Wet bedding around the waterers is another red flag – clean it up immediately to prevent health issues.
Your Chicks Are Living Thermometers
Forget fancy thermometers – your chicks will tell you everything about the temperature in their brooder. Start with 95°F that first week, then drop it by 5°F each week after. But here’s what really matters: watch how they position themselves.
Too cold? They’ll pile together directly under the heat source like they’re trying to become one super-chick. Too hot? They’ll spread to the far corners, avoiding the heat like it’s radioactive. Just right? They’ll scatter comfortably throughout the brooder, some near the heat, some farther away, all looking relaxed.
I’ve found this behavioral temperature gauge to be far more reliable than any thermometer reading.
Keeping Things Clean Without Going Crazy
Daily maintenance doesn’t have to be a huge production, but it’s non-negotiable. Clean those waterers and feeders every day – bacteria love nothing more than leftover chick food and stagnant water. Spot-clean any wet bedding immediately, and scoop visible droppings with a kitchen spoon or small dustpan.
For easy cleanup, some folks swear by puppy pads under the bedding. I add fresh bedding as needed rather than doing complete changes – just stir it occasionally to prevent it from packing down. And please, never use cedar shavings. Your chicks’ tiny respiratory systems can’t handle the oils, and it’s just not worth the risk.
The key is staying ahead of problems before they become disasters. A few minutes of daily attention now saves hours of worry later.
Your Chick-Raising Journey Starts Here
Look, I’m not going to sugarcoat it – raising chicks from day one can feel like you’re juggling flaming torches while riding a unicycle. There are so many variables to track, from that precise 95°F temperature to making sure little Peep #3 isn’t getting bullied away from the feeder. But here’s what I’ve learned after shepherding countless fuzzballs through their first few weeks: it gets so much easier once you nail the basics.
Remember that disaster I mentioned at the beginning? Those three shivering Rhode Island Red chicks who inspired this whole guide? They’re now healthy, egg-laying hens who still follow me around the yard like feathered puppies. Every time I see them dust-bathing in the garden or hear their contented clucking, I’m reminded that those early days of panic and 2 AM temperature checks were absolutely worth it.
The truth is, once you’ve set up your brooder correctly and gotten into the rhythm of daily care, you’ll find yourself actually enjoying those first few weeks. There’s something magical about watching a tiny ball of fluff transform into a confident young chicken. My kids still get excited every morning to check on “their” chicks, and honestly, so do I.
Will you make mistakes? Probably. I certainly did – ask me about the time I accidentally used cedar shavings (spoiler: don’t). Will you worry more than necessary? Almost definitely. But you’ll also discover that chicks are remarkably resilient little creatures, and your careful attention to their needs will pay off in healthy, happy birds.
The best part? Once you’ve successfully raised your first batch of chicks, you’ll have that quiet confidence that comes with hands-on experience. You’ll be the one other chicken keepers turn to for advice, and trust me, that’s a pretty good feeling.
So take a deep breath, double-check your chicken brooder setup one more time, and get ready for one of the most rewarding experiences in chicken keeping. Your future flock is counting on you – and from everything we’ve covered, I know you’re ready for the challenge.
Happy brooding, and may your chicks grow strong and your heat lamps stay securely fastened!
FAQs
Q1. When should I move my chicks from the incubator to the chicken brooder? Move chicks to the brooder when they are completely dry and fluffy, typically 12-24 hours after hatching. Ensure they are active and have strong leg stability before transferring them.
Q2. What are the essential items needed for a chick brooder? Essential items for a chick brooder include a safe container with tall sides, a reliable heat source (like a heat plate or lamp), appropriate bedding (such as pine shavings), and chick-specific feeders and waterers.
Q3. How do I maintain the correct temperature in the chicken brooder? Start with a temperature of 95°F for the first week, then decrease it by 5°F each week. Monitor chick behavior – if they huddle under the heat source, it’s too cold; if they avoid it, it’s too hot.
Q4. How often should I clean the brooder? Clean waterers and feeders daily, remove wet bedding promptly, and scoop visible droppings daily. Add fresh bedding as needed rather than replacing it entirely, and stir occasionally to prevent compaction.
Q5. What signs indicate a healthy chick in the brooder? Healthy chicks are active, explore their environment, distribute evenly in the brooder, chirp steadily, eat and drink regularly, and sleep without piling together. They should also have clear eyes and clean feathers.