
Table of Contents
- What is Bumblefoot?
- Recognizing the Early Signs
- Common Causes of Bumblefoot
- Treatment Options: Surgical vs. Non-Surgical
- Step-by-Step Non-Surgical Treatment
- Preventing Bumblefoot in Your Flock
- When to Call the Vet
- Essential Supplies for Treatment
- FAQs About Bumblefoot
- Final Thoughts
What is Bumblefoot?
Picture this: you’re doing your regular morning chicken check, and you notice your favorite hen, Henrietta, is doing what I call the “chicken hop” – favoring one foot like she’s auditioning for a poultry version of hopscotch. When you gently scoop her up for a closer look, you spot it – a dark, crusty scab on the bottom of her foot pad. Welcome to the not-so-exclusive club of chicken keepers who’ve dealt with bumblefoot!
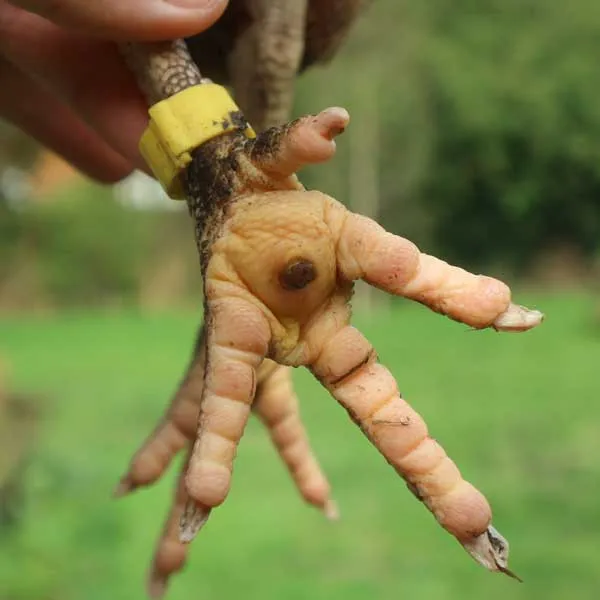
Bumblefoot, or plantar pododermatitis if you want to impress your vet, is essentially a staph infection in your chicken’s foot. The name comes from the characteristic “bumble” or hard kernel that forms inside the foot pad – think of it as a really stubborn, infected splinter that’s overstayed its welcome. While it might sound cute (who wouldn’t want bumble feet?), this condition is no laughing matter for our feathered friends.
The infection is caused by Staphylococcus aureus bacteria, which are naturally present on chicken skin and in their environment. When these bacteria find their way through a cut, scrape, or puncture wound in the foot pad, they throw a party nobody wants – creating a pus-filled abscess that hardens into that telltale black or brown scab.
Recognizing the Early Signs
After treating over a dozen cases in my own flock (yes, I’ve become somewhat of a bumblefoot expert by necessity), I’ve learned that early detection makes all the difference. Here’s what to watch for:
Early Stage Indicators:
- A shiny, reddened area on the foot pad
- Small black dot or raised rough patch
- Slight swelling between the toes
- Your chicken starts walking like they’re wearing one high heel
Progressive Symptoms:
- Obvious limping or favoring one foot
- Swelling that makes the foot look like a puffy marshmallow
- Hard, black scab on the bottom of the foot
- Your normally active hen suddenly prefers to sit more than scratch
Advanced Warning Signs:
- Foot swollen to balloon proportions
- Hot to the touch (yes, chicken feet can run a fever!)
- Multiple scabs or drainage
- Complete reluctant to bear weight on the affected foot
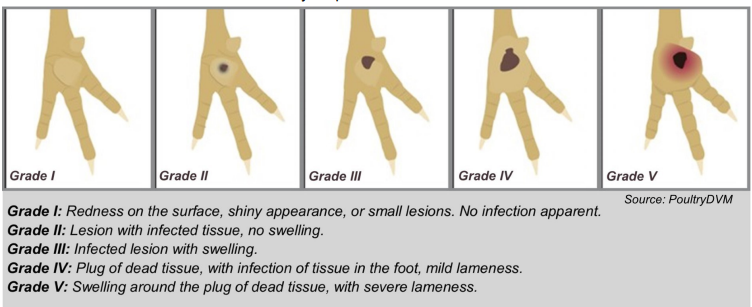
The veterinary world actually grades bumblefoot from 1 to 5, with Grade 1 being “just a little angry” and Grade 5 being “call the vet yesterday.” Most backyard cases fall somewhere in the middle, which is good news for us DIY chicken medics.
Common Causes of Bumblefoot
Understanding what causes bumblefoot is like solving a chicken coop mystery. Through my years of chicken keeping (and more bumblefoot surgeries than I care to count), I’ve identified the usual suspects:
The Height Problem: Those Instagram-worthy, sky-high roosts might look great, but when your heavy Buff Orpington launches herself down from a 4-foot perch every morning, it’s like doing repeated belly flops onto concrete. Keep roosts under 18 inches – your chickens’ feet will thank you.
The Sharp Object Syndrome: Chickens are basically feathered archaeologists, scratching and pecking at everything. Splinters from rough roosts, sharp stones, wire edges, or that random nail that somehow appeared in the run can all create the perfect entry point for bacteria.
The Heavyweight Factor: My chunky Cochin girls are more prone to bumblefoot than my svelte Leghorns. Extra weight means extra pressure on those foot pads, especially during their daily roost dismounts.
Environmental Hazards:
- Constantly wet, muddy conditions (bacteria love a good mud spa)
- Concrete or wire flooring (about as comfortable as walking on Legos)
- Poor coop maintenance (dirty litter is a bacterial breeding ground)
Nutritional Deficiencies: Chickens lacking vitamin A or consuming too much protein can develop weakened skin that’s more susceptible to injury. It’s like how your lips get chapped in winter – except it’s chicken feet we’re talking about.
Treatment Options: Surgical vs. Non-Surgical
Now comes the moment of truth – treating bumblefoot. You have two main options, and I’ve tried both with varying degrees of success (and squeamishness).
Surgical Treatment: This involves playing chicken surgeon – cutting out the infected core with a scalpel. While effective for severe cases, it requires steady hands, a strong stomach, and preferably someone to hold the chicken while you channel your inner Dr. McDreamy. I’ve done it, but let’s just say it’s not my favorite weekend activity.
Non-Surgical Treatment: This is my go-to method, especially for mild to moderate cases. It involves soaking, softening, and gently removing the scab and infection without cutting. Think of it as a spa day with a medical purpose.
Step-by-Step Non-Surgical Treatment
After treating my hen Gertrude’s bumblefoot last month (her third bout – she’s apparently going for a record), I’ve refined my technique. Here’s my tried-and-true method:
What You’ll Need:
- Epsom salt (get the plain kind from Tractor Supply)
- Warm water basin
- Clean towels
- Tweezers
- Vetericyn Plus Poultry Care Spray
- Triple antibiotic ointment (without pain relief)
- Non-stick gauze pads
- 3M Vetrap bandaging tape
- Disposable gloves
- Treats (bribery works wonders)
The Treatment Process:
- Prepare the Spa: Mix 1-2 tablespoons of Epsom salt in a basin of warm water. The water should be comfortably warm – test it like you would a baby’s bath.
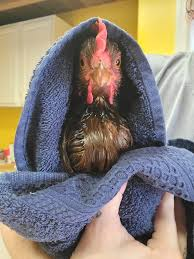
- The Chicken Burrito: Wrap your patient in a towel, leaving the affected foot exposed. This keeps wings contained and reduces stress. My girls actually seem to find it calming – or maybe they’re just plotting revenge.
- Soak Time: Let the foot soak for 15-20 minutes. I’ve found this is the perfect time to catch up on chicken forums or plan my next coop improvement. Some chickens even doze off during their foot bath!
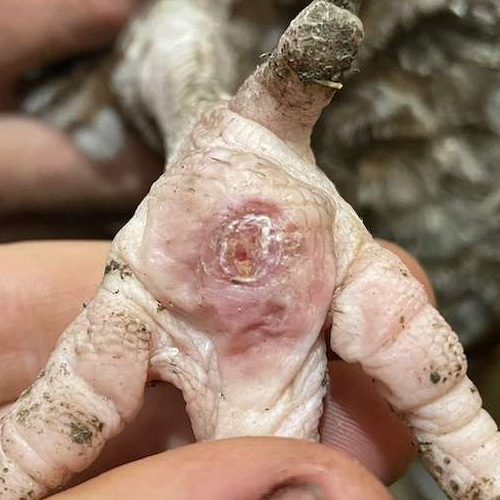
- Gentle Removal: After soaking, the scab should be soft. Using clean tweezers, gently work around the edges of the scab. If you’re lucky, it’ll pop out like a wine cork. If not, don’t force it – that’s what additional soaking sessions are for.
- Clean and Inspect: Once the scab is removed, you might see a hole where the infection was. Spray thoroughly with Vetericyn Plus and let it work its magic for 30 seconds.
- Dress the Wound: Apply a small amount of antibiotic ointment, cover with a gauze pad, and wrap securely with Vetrap. The key is firm but not tight – you don’t want to cut off circulation to those precious chicken toes.
- Recovery Suite: Keep your patient separated in a clean, dry area for at least 24-48 hours. I use a large dog crate with soft bedding.
Daily Care: Change the bandage every 2-3 days, or daily if it gets dirty. Most mild cases heal within a week, though stubborn infections might need 2-3 weeks of TLC.
Preventing Bumblefoot in Your Flock
An ounce of prevention is worth a pound of chicken feed – or in this case, avoiding hours of foot soaking. Here’s how I’ve dramatically reduced bumblefoot cases in my flock:
Roost Management:
- Keep roosts 18 inches or lower
- Use 2×4 boards with the wide side up (not 2x2s)
- Sand rough edges smooth
- Add bedding below roosts for softer landings
Environmental Improvements:
- Switch to sand in the coop and run (drains well, easy to clean)
- Remove sharp objects during regular coop inspections
- Fix muddy areas with proper drainage
- Avoid wire flooring or cover it with solid materials
Nutritional Support:
- Feed a balanced layer feed (check out options at Tractor Supply’s poultry feed section)
- Limit treats to 10% of diet
- Ensure adequate vitamin A (dark leafy greens are great)
Regular Health Checks: I do monthly “pedicures” – checking each bird’s feet while trimming nails if needed. It takes 30 minutes for my flock of 15, and it’s caught several early cases.
When to Call the Vet
While I’m all for DIY chicken care, sometimes you need professional help. Call your avian vet if:
- The infection has spread up the leg
- Multiple toes are affected
- Your chicken is completely lame
- There’s active bleeding or foul-smelling discharge
- Home treatment hasn’t improved things after a week
- You see exposed bone or tendons
- Your chicken stops eating or drinking
Remember, Grade 4-5 bumblefoot can lead to systemic infection and even death. When in doubt, make that vet appointment.
Essential Supplies for Treatment
Building a chicken first aid kit specifically for bumblefoot has saved me multiple emergency supply runs. Here’s what I keep stocked:
Must-Have Items:
- Vetericyn Plus Antimicrobial Poultry Care Spray – The gold standard for wound care
- Epsom Salt (5 lb bag) – For therapeutic foot soaks
- 3M Vetrap Bandaging Tape – Self-adhering, doesn’t stick to feathers
- Non-stick gauze pads (various sizes)
- Triple antibiotic ointment (WITHOUT pain relief ingredients)
- Chlorhexidine solution for cleaning tools
Nice-to-Have Additions:
- First Aid Kit Container – Keep everything organized
- Headlamp for hands-free lighting
- Disposable gloves
- Sharp scissors dedicated to chicken care
- Small basin for foot soaking
I keep my bumblefoot kit separate from my general chicken first aid supplies. This way, when I spot that telltale limp, I can grab the kit and get to work without hunting for supplies.
FAQs About Bumblefoot
Q: Can bumblefoot spread to other chickens? A: While the staph bacteria that cause bumblefoot are contagious, the infection itself doesn’t spread from chicken to chicken like a cold. However, if one bird gets bumblefoot from environmental conditions (rough perches, wet litter), others in the same environment are at risk. Think of it as multiple chickens getting splinters from the same rough board.
Q: How long does bumblefoot take to heal? A: With proper treatment, mild cases (Grade 1-2) typically heal within 7-10 days. Moderate cases (Grade 3) might need 2-3 weeks of treatment. Severe cases can take a month or more and often require veterinary intervention. I’ve found that consistent daily care makes a huge difference in healing time.
Q: Can I use regular table salt instead of Epsom salt? A: No! This is a common mistake. Table salt (sodium chloride) and Epsom salt (magnesium sulfate) are completely different compounds. Epsom salt has anti-inflammatory properties and helps draw out infection. Table salt won’t provide the same benefits and might even irritate the wound.
Q: Is bumblefoot painful for chickens? A: Yes, bumblefoot is definitely painful, though chickens are masters at hiding discomfort (a survival instinct from their wild ancestors). The infection creates pressure in the foot pad, similar to how a splinter feels to us. That’s why early treatment is so important – less suffering for your feathered friend.
Q: Can bumblefoot kill a chicken? A: Unfortunately, yes. If left untreated, the infection can spread to bones, joints, and eventually become systemic (throughout the body). I’ve never lost a bird to bumblefoot because I catch it early, but I’ve heard heartbreaking stories from other chicken keepers who didn’t recognize the signs in time.
Final Thoughts
Bumblefoot might seem intimidating at first, but with the right knowledge and supplies, it’s completely manageable. In my years of chicken keeping, I’ve gone from panicking at the sight of a limping hen to confidently treating bumblefoot in my kitchen (much to my family’s initial horror).
Remember, the best treatment is prevention. Regular foot checks, proper coop management, and a well-stocked first aid kit will serve you well. And when bumblefoot does strike – because let’s face it, if you keep chickens long enough, you’ll encounter it – you’ll be ready.
Stay vigilant, keep those roosts low, and may your chickens’ feet stay bumble-free!
For more chicken health articles, check out our guides on Common Chicken Diseases and Building the Perfect Chicken First Aid Kit. Have you dealt with bumblefoot in your flock? Share your experiences in the comments below!