
Picture this: you’re watching your hens go about their daily routine, and you start wondering what it would be like to witness the miracle of life unfold right in your own home. If you’ve ever been curious about hatching your own chicks, you’re in for one of chicken keeping’s most rewarding adventures.
Incubating chicken eggs takes just 21 days from start to finish, but those three weeks offer an incredible journey from a simple egg to a fluffy, chirping chick. The process might seem intimidating at first, but it’s surprisingly manageable once you understand the basics.
You’ll need to maintain a steady temperature around 100.5 degrees Fahrenheit and keep a close eye on humidity levels—about 50-55% for the first 17 days, then bumping it up to 70% as your chicks prepare to hatch. These numbers serve as your guideposts, though different chicken breeds might need slight adjustments along the way.
The daily routine involves turning your eggs at least 3 times during the first 18 days and candling them around day 7-10 to peek at how your future chicks are developing. Each step brings you closer to that incredible moment when tiny beaks start breaking through their shells. Even as a beginner, you can expect good results—a hatch rate of 50% is considered successful for shipped eggs, while eggs from your own fertile flock can give you anywhere from 55% to 95% success rates.
This guide walks you through everything you need for your first successful hatch, from getting your incubator ready to welcoming newly hatched chicks who can actually survive their first 72 hours on the yolk they absorbed just before hatching.
Why Hatch Chicken Eggs at Home?
If you’ve been keeping chickens for any length of time, you’ve probably found yourself wondering what it would be like to hatch your own chicks. Most chicken keepers eventually get curious about taking that next step beyond just collecting eggs and caring for adult birds.
Experience the full life cycle
There’s something magical about watching life unfold from beginning to end. After just a few days of incubation, you can actually see a tiny heartbeat during candling, and before long, wings, legs, and a beak become visible. This front-row seat to nature’s most fascinating process creates a connection with your birds that’s hard to describe until you’ve experienced it yourself.
The journey from single cell to fully formed chick happens remarkably quickly. From seeing their first pip in the eggshell to providing special care as they grow, you build a unique bond with each chicken. For many chicken keepers, this completes the circle—you’re no longer just caring for adult birds or buying chicks from someone else, but participating in the entire life cycle.
Improve flock biosecurity
When you hatch chicks from your own flock’s eggs, you know exactly what you’re getting. You know what the parent birds ate, how they were treated, and their living conditions. This gives you much greater control over your birds’ health from day one.
Every time you introduce new birds to your flock, you’re taking some risk of bringing diseases along with them. Hatching your own minimizes this risk considerably. If you use a broody hen to hatch eggs from your flock, the integration of new chicks tends to be much smoother than when introducing “stranger” chicks from outside sources.
Save money over time
The economics of hatching can be tricky to calculate. The initial investment in an incubator and related equipment represents a significant upfront cost. But if you’re raising rare breeds or planning to expand your flock regularly, purchasing fertilized eggs or chicks can become expensive over time.
Once you’ve made that initial investment, hatching eggs from your own flock essentially costs nothing. Your hatched chicks grow into hens and roosters that produce more fertilized eggs for future hatching. For those looking at long-term chicken keeping, this can represent substantial savings.
The savings aren’t always immediate, though. As one feed store manager points out, “With all this inflation, chicken feed is no longer ‘just chicken feed.’ It’s expensive…” You’ll want to have realistic expectations about costs.
Teach kids about nature
Perhaps one of the most compelling reasons to incubate chicken eggs at home is the educational opportunity it provides. Children become fascinated watching an egg transform into a living creature. This hands-on experience teaches:
- Biology and life cycles in an interactive, engaging way
- Responsibility and animal care principles
- Patience and observation skills
- The source of our food
The 21-day development process offers numerous teaching moments, from explaining how embryos receive nourishment from the yolk to observing how chicks absorb the yolk shortly before hatching—allowing them to survive up to 72 hours without food after emerging.
Keep in mind that while each breed develops according to the same basic timeline, specific incubating chicken eggs temperature and humidity requirements may vary slightly between breeds. What works perfectly for one breed might need minor adjustments for another.
What You Need to Get Started
Getting your first incubation setup ready doesn’t have to break the bank, but having the right equipment makes all the difference between a successful hatch and a disappointing experience. You’ll want to gather these essentials before you start your 21-day journey.
Fertile, clean, unwashed eggs
Your hatching success starts with quality fertile eggs, and this means you’ll need a rooster in your flock. One rooster can handle about ten hens, so if you don’t have your own setup, you’ll need to source fertile eggs from someone who does.
When you’re selecting eggs for incubation, look for:
- Normal size and shape (skip the really tiny ones or jumbo sizes)
- Clean shells without any cracks or weird bumps
- Fresh eggs that are 0-7 days old (up to 10 days can work, but fresher is better)
- Eggs from healthy hens between 1-3 years old
Here’s something important—never wash eggs you plan to hatch. That natural coating on the shell protects the developing chick inside. If you spot a little dirt, gently clean it off with fine sandpaper or steel wool instead of water. Store your fertile eggs pointed-end down at around 55-60°F and turn them daily until you’re ready to pop them in the incubator.
Reliable incubator with temperature control
Your incubator choice can make or break your hatching success, so this is where you want to invest wisely. Most incubators fall into two camps: forced-air models with fans that circulate air, or still-air versions without fans.
Forced-air incubators work best at 99-99.5°F, while still-air models need to run a bit warmer at 100-101°F. Look for these helpful features:
- Automatic egg turning (saves you from turning eggs 3-5 times every day)
- Digital temperature display and controls
- Built-in humidity management
- Easy-to-clean surfaces
- Right size for your needs
- Viewing window so you can peek without opening
Premium models like the Brinsea Ovation 56 EX come with all the bells and whistles, but decent mid-range options like R-Com incubators can work well too. Keep in mind that different chicken breeds might need slight temperature tweaks from these standard settings.
Thermometer and hygrometer
Even if your incubator has digital displays, I always recommend backup thermometers and hygrometers. These double-check that your incubator’s sensors are telling you the truth.
Place your thermometer at egg level—that’s the temperature your developing chicks actually feel. You’ll want to keep things between 99.5-100.5°F throughout incubation. This tight range matters because even small temperature swings can hurt your hatch rates.
For humidity, stick to 50-55% during the first 18 days, then bump it up to 65-70% for those final three days when your chicks are working their way out of their shells.
Backup power plan
Power outages are every incubator’s worst enemy. Since your setup runs entirely on electricity, you need a backup plan ready to go.
Your options include:
- Power inverter hooked up to a car battery or 12V battery
- Uninterruptible Power Supply (UPS) system for short outages (2-3 hours)
- Portable generator for longer power losses
- Chemical hand warmers for very brief outages (use carefully to avoid overheating)
Find a stable spot for your incubator away from drafts, direct sunlight, and high-traffic areas. Run it empty for 24-48 hours before adding eggs to make sure everything stays steady.
How to Set Up Your Incubator
You’ve got your equipment ready and your eggs selected—now comes the moment that sets the stage for your entire hatching journey. Setting up your incubator properly can make the difference between a successful hatch and disappointment three weeks later.
Choose a stable, draft-free location
Your incubator needs a home that’s as steady as your most reliable hen. Find a spot where the temperature stays reasonably constant, ideally between 18-22°C (65-72°F). You’ll want to avoid areas that seem convenient but can cause problems:
- Direct sunlight that turns your incubator into an oven
- Drafty spots near doors, windows, or air vents
- Places where the temperature jumps around throughout the day
- High-traffic areas where someone might accidentally bump into it
Keep your incubator away from your breeding flocks or other birds to prevent contamination. A spare bedroom, insulated garage, or dedicated corner works beautifully, as long as the environment stays stable.
Sanitize the incubator before use
Clean equipment directly impacts how many chicks you’ll welcome into the world. Lack of sanitation will decrease hatchability, so take this step seriously. About a week before you plan to start, give your incubator a thorough cleaning:
- Take apart all the pieces you can safely remove
- Wash everything with a 10% bleach solution, then follow up with warm soapy water
- Rinse thoroughly to remove every trace of cleaning products
- Let all parts dry completely before putting them back together
If you’re working with a foam incubator, be gentle with chemical cleaners since they can melt the foam. A cloth dampened with mild bleach solution works better.
Set correct temperature and humidity
Temperature control is where many first-time hatchers stumble, but it doesn’t have to be complicated. For forced-air incubators (the ones with fans), set your temperature to 99-99.5°F. Still-air incubators need slightly higher settings of 100-101°F measured at egg height.
Humidity follows a simple two-stage pattern:
- Days 1-17: Maintain 50-55% relative humidity
- Days 18-21: Increase to 70% relative humidity for hatching
Keep those water channels filled to maintain proper humidity levels. Some incubators have specific reservoirs marked with a “W” for water. Check these levels regularly since they directly impact how your embryos develop.
Let it stabilize before adding eggs
Patience pays off during setup. Once you’ve assembled everything and added water:
- Run the incubator for at least 24 hours before adding eggs
- Double-check temperature stability with an additional thermometer
- Test any automatic turners to make sure they’re working properly
- Confirm humidity has reached your target level
This waiting period isn’t optional—even small fluctuations can impact your hatch rates. Every incubator needs time to heat up and find its rhythm.
Remember that these settings serve as guidelines and may need slight adjustments depending on your specific chicken breed and incubator model.
Step-by-Step Guide to Incubating Chicken Eggs
The 21-day journey from egg to chick follows a precise timeline that needs your attention at key moments. Here’s how to walk through each critical stage, keeping in mind that these guidelines may need slight adjustments depending on your specific chicken breed.
Day 1: Set the eggs with large end up
Start by placing your eggs in the incubator with the large end up, where the air cell sits. This positioning helps the developing chick orient itself properly for hatching. Let cold eggs warm gradually to room temperature before placing them in the incubator—this prevents condensation that could lead to bacterial contamination. Mark each egg with a pencil (X on one side, O on the other) to help track turning.
Days 1–18: Turn eggs 3–5 times daily
Your eggs need regular turning throughout the first 18 days to prevent embryos from sticking to the shell membrane. Turn them at least 3 times daily, though 5 times works even better. Broody hens actually turn their eggs approximately 96 times every 24 hours! When turning manually, make sure your hands are clean and free from oils that could clog shell pores. If you’re using an automatic turner, double-check that it’s working properly.
Day 10: Candle eggs to check development
Around day 10, it’s time to candle your eggs to see how things are progressing. Take your eggs to a dark room and hold a bright light against the large end. A developing embryo shows up as a dark spot with spider-like veins spreading outward. Non-viable eggs might show a blood ring or stay completely clear. This is your chance to remove any eggs that aren’t developing, since they could rot and potentially harm the viable ones.
Day 18: Stop turning and increase humidity
Day 18 marks “lockdown” mode. Remove any egg turners and position your eggs on their sides. At the same time, bump your humidity up to 65-70%—this higher humidity prevents membranes from drying out when chicks begin to pip. During these final days, the chick positions itself for hatching, so keep disturbance to a minimum.
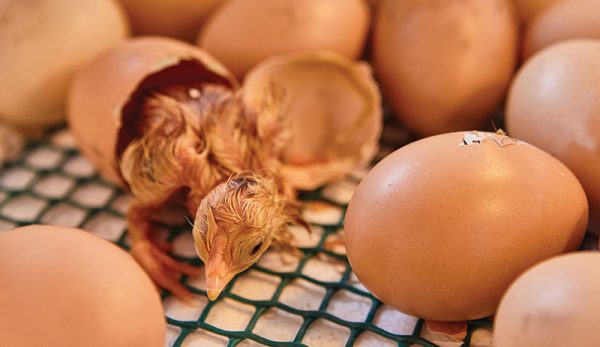
Day 21: Let chicks hatch naturally
Around day 21, the magic begins! Chicks first pip internally into the air cell, then externally through the shell. The entire process can take up to 24 hours per chick. Resist the urge to help—premature assistance can damage blood vessels still attached to the shell, causing fatal bleeding. Once hatched, let your chicks dry completely before moving them to a brooder.
Caring for Chicks After Hatching

If you’ve successfully made it through the 21-day incubation period, congratulations—but your work isn’t quite finished yet. Those newly hatched chicks need a safe, warm home waiting for them, and the transition from incubator to brooder can be one of the trickiest parts of the whole process.
Prepare a warm brooder in advance
Your chicks need their new home ready before they even finish drying off. Set up the brooder at least 48 hours before your expected hatch date. Each little chick needs about 6 square inches of space to start, though you’ll want to expand that to 1 square foot once they hit 4-8 weeks old.
Here’s something many new chicken keepers don’t realize—round or circular brooders work much better than square ones. Chicks have this tendency to pile up in corners when they get cold or scared, and that can actually suffocate the ones on the bottom. Keep your brooder somewhere stable, away from drafts, predators, and those annoying temperature swings that seem to happen near windows and doors.
Use safe bedding and heat sources
The bedding you choose makes a real difference in your chicks’ health. Your best options include:
- Pine shavings (skip the cedar—it can mess with their breathing)
- Hemp bedding (great for controlling odors)
- Paper towels (perfect for the first few days)
- Puppy training pads (creates a waterproof barrier)
Whatever you do, avoid newspaper. It’s slippery and can cause splayed legs, which is heartbreaking to deal with. Keep your bedding about 1-3 inches deep.
Temperature is where things get critical. Start at 95°F for that first week, then drop it by 5°F each week after. You can use infrared heat lamps (just make sure they’re secured properly—fires are no joke) or those radiant heat plates that mimic a mama hen’s warmth. Watch your chicks closely—if they’re huddled together like they’re freezing, it’s too cold. If they’re scattered to the edges avoiding the heat, turn it down.
Provide clean water and chick starter feed
The moment those chicks go into their brooder, they need room-temperature water available. Use proper chick waterers to prevent any drowning accidents. For food, stick with a high-protein chick starter feed—at least 18% protein. Keep both food and water available around the clock, and clean those containers daily.
Watch for signs of distress or illness
Healthy chicks are little bundles of energy—they eat regularly, move around, and produce normal droppings. You’ll want to watch for trouble signs like excessive huddling, drinking too much water, lethargy, or weird-looking droppings.
Listen to them, too. Happy chicks make these soft, low “cheeps,” while distressed ones will emit sharp, high-pitched calls that’ll get your attention fast.
Keep in mind that these guidelines work well for most situations, but different chicken breeds might need slight adjustments to these recommendations.
Conclusion
If you’ve made it this far, you’re ready to start your own hatching adventure. The 21-day journey from egg to chick is one of those experiences that stays with you long after your first successful hatch.
The truth is, successful hatching comes down to paying attention to the details we’ve covered—from setting up your incubator in the right spot to resisting the urge to help chicks during their final push out of the shell. Each step builds on the last, creating a chain of care that brings those tiny lives into the world.
What makes this whole process so special goes beyond just adding new birds to your flock. You’re participating in something that connects you deeper to your chickens and gives you a front-row seat to one of nature’s most incredible processes. Whether you’re doing this to teach your kids about life cycles, improve your flock’s health, or simply because you’re curious about the miracle happening inside those shells, you’re in for something remarkable.
Keep in mind that every hatch has its own personality. Some batches might surprise you with higher success rates, while others might teach you patience. That’s part of the journey, and it’s what makes each hatch unique. The guidelines we’ve walked through will serve you well, but don’t be afraid to make small adjustments based on what you observe with your specific setup and chicken breeds.
Your first pip, your first chirp from inside the shell, your first sight of a wet chick working its way out—these moments will remind you why chicken keeping captured your heart in the first place. Trust the process, trust your preparation, and get ready to welcome some new members to your flock.
FAQs
Q1. What temperature should I maintain when incubating chicken eggs?
For optimal results, maintain a temperature between 99.5°F and 100.5°F (37.5°C to 38.1°C) throughout the incubation period. This narrow range is crucial for proper embryo development.
Q2. How often should I turn the eggs during incubation?
Turn the eggs at least 3 to 5 times daily for the first 18 days of incubation. This prevents the embryo from sticking to the shell membrane and ensures proper development.
Q3. When should I stop turning the eggs and increase humidity?
On day 18 of incubation, stop turning the eggs and increase the humidity to 65-70%. This higher humidity prevents membranes from drying out as chicks begin to pip.
Q4. Can I help chicks that are struggling to hatch?
It’s best to let chicks hatch naturally without assistance. Premature intervention can damage blood vessels still attached to the shell, potentially causing fatal bleeding.
Q5. What should I prepare for newly hatched chicks?
Prepare a warm, draft-free brooder with appropriate bedding, a heat source maintaining 95°F for the first week, clean water in specialized chick waterers, and high-protein chick starter feed. Ensure the brooder is ready at least 48 hours before the expected hatch date.